Check out what's new:
Reducing CPU usage in Machine Learning model inference with ONNX Runtime
Optimizing machine learning models to achieve greater levels of efficiency can be a challenge. One of our engineers shares how he reduced CPU usage from 47% to 0.5% without significantly increasing latency.

Optimizing machine learning models to achieve greater levels of efficiency continues to be a challenge for many applied machine learning applications.
At Inworld, the need to power our AI-driven characters in real-time conversations and interactions through our 20 machine learning models requires high performance with low inference latency. We are also always seeking to reduce our hardware utilization but need to do so in ways that don’t significantly impact our application’s latency. After all, no one wants an AI character that pauses too long before answering!
Recently, when we developed a new service with a small ONNX model, we found it had abnormally high CPU usage and decided to find the reason for it. In the end, we were able to reduce CPU usage from 47% to 0.5% without significantly increasing latency.
In this post, I’ll walk you through the problem we discovered and how we fixed it. For the purpose of the post, all tests are written in Python but similar improvements can be achieved by using any language supported by ONNX Runtime.
First things first! Create an ONNX model
Let’s create an ONNX model for our test. I’ll use Hugging Face transformers for this and spin up two models: a small model with 22M parameters and and a large one with 345M parameters.
python3 -m transformers.onnx --model=sentence-transformers/all-MiniLM-L6-v2 --feature sequence-classification  ./onnx
1
2python3 -m transformers.onnx --model=bert-large-uncased --feature sequence-classification  ./onnx-large
Now that we have that set up, let’s write a simple application which we’ll name test.py. Here’s what ours looks like:
import onnxruntime as ort
1import numpy
2import time
3
4opts = ort.SessionOptions()
5session = ort.InferenceSession("onnx/model.onnx", opts, providers=["CPUExecutionProvider"])
6
7NTokens = 10
8
9inputs = {
10    "input_ids": numpy.zeros((1, NTokens), dtype=numpy.int64),
11    "attention_mask": numpy.zeros((1, NTokens), dtype=numpy.int64),
12    "token_type_ids": numpy.zeros((1, NTokens), dtype=numpy.int64)
13}
14
15while True:
16    t = time.time()
17    result = session.run(["logits"], inputs)
18    print((time.time()- t)*1000)
19    time.sleep(1)
Our application is a simple service simulation that receives requests every second and forwards them to ONNX.
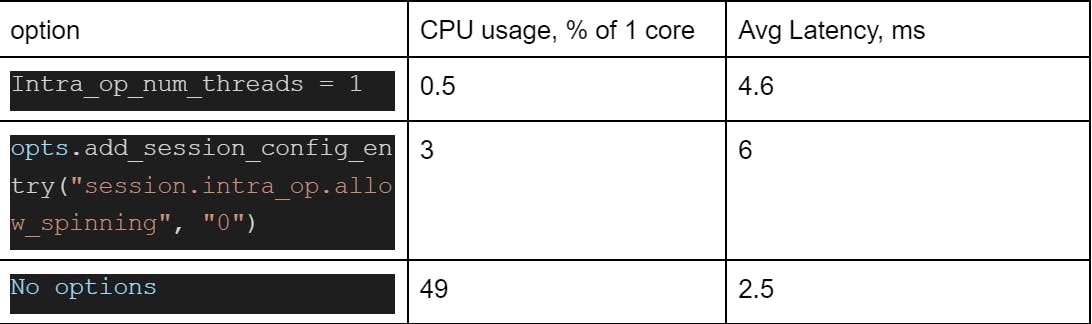
Now that our application is set up, let’s check on our CPU usage. It’s using around 49% of a single CPU core. That’s not great! What’s about our inference latency? The average latency is ~2.5 milliseconds on my PC.
Now, let’s build ONNX Runtime
So, what’s causing this? We want to find out so we can make our models run more efficiently. But how do we go about finding the reason? To do this, I suggest you build ONNX Runtime from its source and use the Linux perf tool to begin your investigation!
Here’s how to do that:
1. Clone ONNX Runtime:
git clone: https://github.com/microsoft/onnxruntime.git2. Navigate to the source:
cd onnxruntime3. Install requirements:
pip install -r requirements.txt.in4. Build ONNX Runtime from source in debug configuration with bindings to python:
./build.sh --config Debug --build_shared_lib --parallel --enable_pybind --skip_tests --build_wheel --update --build5. Install the package that we have built:
pip install ./build/Linux/Debug/dist/*.whlWhy are we building ONNX Runtime for this? We need debug symbols for better view in performance tools, with original source code indication, not only assembly
Time to conduct an application and record performance check
Next, we’ll perform an analysis of our application and record performance with this line of code:
python3 test.pyThe output of the application should look something like this:
1.817464828491211
12.365589141845703
22.446413040161133
32.4366378784179688
42.579927444458008
52.73895263671875
62.4187564849853516
72.1715164184570312
81.9443035125732422
92.778291702270508
102.552509307861328
112.3412704467773438
122.4993419647216797
This list will also include the time in milliseconds spent running predictions with ONNX.
Then, in another terminal, find the pid of your test application using
ps aux | grep python3 | grep test.pyNext, you’ll want to:
- Run perf
sudo perf record --call-graph dwarf -p <pid>- Press Ctrl+C after some time, for example after 10 seconds
- And then to view the results of the test request
sudo perf reportYou will see something like this:
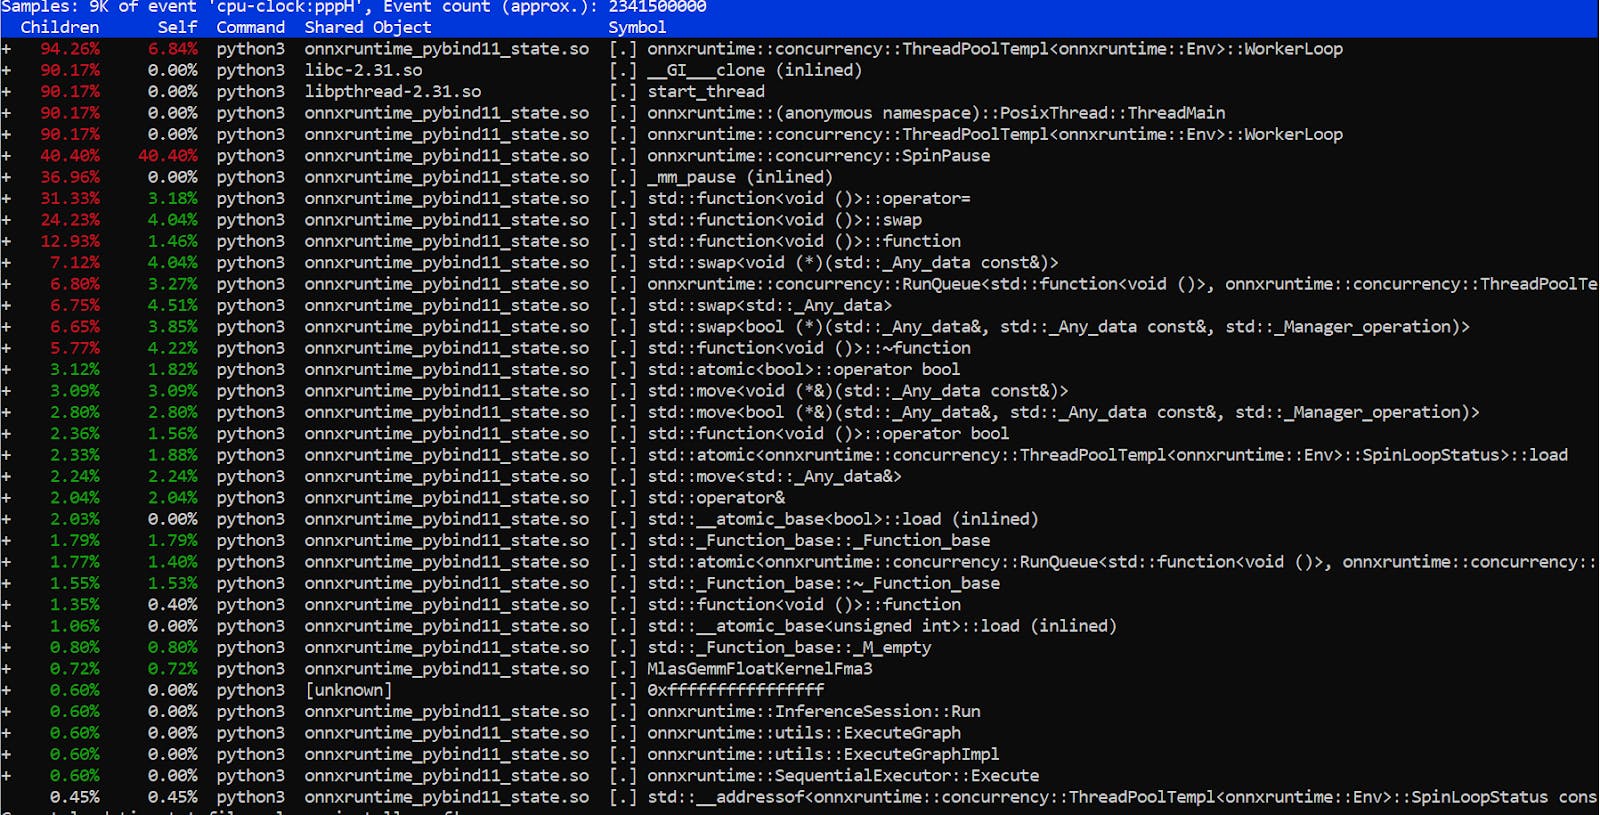
At this point, you should select hot path.

Press enter and select annotate
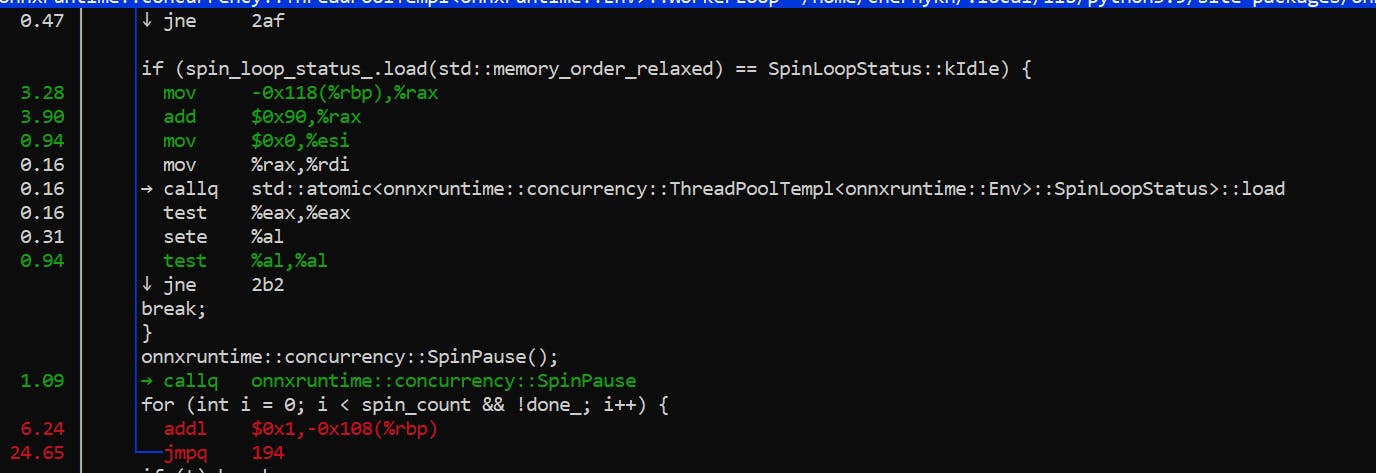
As you can see, the application is spending most of its time in this loop.

Essentially, it’s just waiting for a new work. Internally, ONNX Runtime has a task queue and N threads, which are programmed to get tasks from the queue and execute them when they show up.
So, why is it a busy (and CPU-heavy) wait? Likely because busy waits are faster than semaphore syscalls during periods of high traffic or high request volumes.
Let’s investigate what we can do to decrease our CPU usage without increasing our latency.
Time to test solutions
All of our tests will be performed on a release build installed from pip.
1. Disable spin waiting
First of all, we can start by disabling spin waiting using the session.intra_op.allow_spinning option. That option is enabled by default.. When we disable allow_spinning, ONNX Runtime will wait for a new job using the OS.
import onnxruntime as ort
1import numpy
2import time
3
4
5opts = ort.SessionOptions()
6opts.add_session_config_entry("session.intra_op.allow_spinning", "0")
7session = ort.InferenceSession("onnx/model.onnx", opts, providers=["CPUExecutionProvider"])
8
9
10NTokens = 10
11inputs = {
12    "input_ids": numpy.zeros((1, NTokens), dtype=numpy.int64),
13    "attention_mask": numpy.zeros((1, NTokens), dtype=numpy.int64),
14    "token_type_ids": numpy.zeros((1, NTokens), dtype=numpy.int64)
15
16}
17
18while True:
19    t = time.time()
20    result = session.run(["logits"], inputs)
21    print((time.time()- t)*1000)
22    time.sleep(1)
While that solution gives us an instant positive result by decreasing CPU usage to ~3% (that’s 16 times better than when we started), it has created an average latency of 6 milliseconds (2.4 times higher). Not an ideal solution.
But, maybe, we can find a better solution?
2. Disable thread pooling (instead of disabling spin wait)
Now, let’s try disabling thread pooling. In this case, all models will be executed in a single thread without inter-thread communication. Doing so will remove the time the threads spend communicating – which can sometimes waste more time and resources than the original inference request. That will increase overall latency but only one core will be utilized at a time so it will decrease CPU usage.
It can help when this request is near the end of inter-thread synchronization.
opts = ort.SessionOptions()
1opts.intra_op_num_threads = 1
2session = ort.InferenceSession("onnx/model.onnx", opts, providers=["CPUExecutionProvider"])
And look at that! As a result, we now have achieved just 0.5% CPU usage (that’s 100 times better) and an average latency of 4.6 milliseconds (just 1.84 times higher).
Why did these changes result in such a huge reduction in CPU usage? Because we removed all thread synchronization. As a result, latency increased because we’re now utilizing just one core. While disabling multiple threads can reduce CPU usage, it’s not recommended in use cases where minimal application latency is a requirement like, for example, in algorithmic trading. However, if your use case can tolerate some latency, it can be a great solution to reducing resource use.
Summary for sentence-transformers/all-MiniLM-L6-v2
But what about large models?
Great question! I’ll show you results of making these changes on the bert-large-uncased (345M parameters) model.
session = ort.InferenceSession("onnx-large/model.onnx", opts, providers=["CPUExecutionProvider"])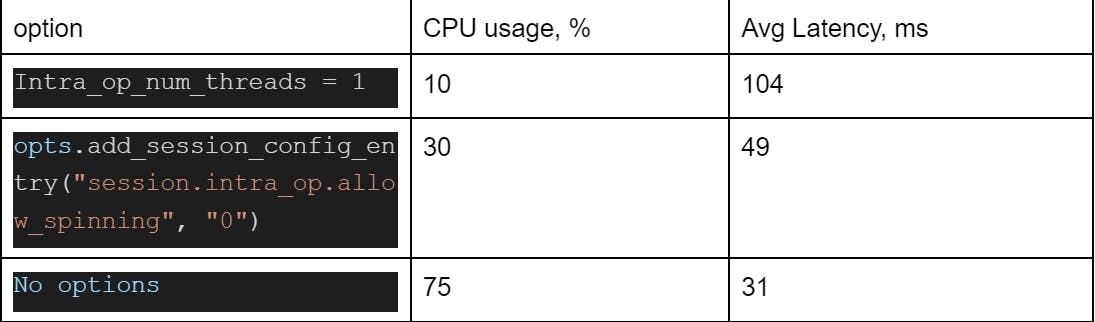
What happens when we disable spinning? ONNX Runtime calls:
nsync::nsync_cv_waitThat calls sem_timedwait with a calling futex syscall. As you know, every syscall has a high cost because of context switching (especially with the increased cost of a TLB cache clean for Meltdown vulnerability protection).
Okay. But what happens if you are using a Kubernetes/docker with CPU limits?
Another good question! Let’s build a Docker image with our test application and try to run it under the docker with CPU limits.
For a better idea of what that might look like, I’ll limit CPU usage to 0.1 and use a small model, but everything I share below can be reproduced in production at higher limits.
Dockerfile:
FROM python:3.9
1WORKDIR /app
2RUN pip3 install onnxruntime==1.11.0
3COPY ./onnx ./onnx
4COPY ./onnx-large ./onnx-large
5COPY ./test.py ./
6ENTRYPOINT ["python3", "/app/test.py"]
Docker build and run
docker build -t test-app ./ && docker run -it --cpus="0.1" test-app

Why do we have such a high P95 and average latency? Because Kubernetes and docker CPU limits are based on Linux cgroups CPU shares with default period of 100 milliseconds.
If your group of processes (your pod in Kubernetes) have exceeded the amount of CPU time in a period (in this case it’s 10 milliseconds, enough for inference in a small model on a single core once a second) your group of processes will be blocked until the next period.
Your application will then not respond to any request. One solution is to use static CPU policy in Kubernetes. That allows you to allocate the whole CPU core for your pod.
For small models that process inferences on the CPU with Kubernetes, it’s better to set intra_op_num_threads to 1 and set up Kubernetes HPA (Horizontal Pod Autoscaler) based on CPU usage for the best application performance over cost.
Conclusion
And there you have it! With a few changes, we were able to reduce CPU usage from 47% to 0.5% on our models without sacrificing too much in latency. By optimizing our hardware usage with the help of ONNX Runtime, we are able to consume fewer resources without greatly impacting our application’s performance. That adds up to significant cost and environmental savings.
While these strategies worked for our use case, they won’t work for all of them. For some, those additional milliseconds of latency could prove a problem. Before using these strategies in your production inference, it’s best to test latency changes in a test environment to be sure that the additional latency is acceptable for your application.
Interested in solving Machine Learning challenges and bringing to life engaging and interactive AI characters? We're hiring!
Links
https://github.com/microsoft/onnxruntime
https://kubernetes.io/docs/tasks/administer-cluster/cpu-management-policies
https://meltdownattack.com/meltdown.pdf
https://brendangregg.com/perf.html
https://kubernetes.io/docs/tasks/run-application/horizontal-pod-autoscale
Additional information
Cpu in benchmark: `12th Gen Intel(R) Core(TM) i9-12900H`